Thursday, 29 November 2012

Building the Controls for the Rig.


The next step was to start making the controls for the rig. This will enable me to move the different appendages of the model in a smooth fashion. The making of the controls was simple enough as we just use nurb primitives (circles,lines,curves) to create the controls. The process was simple but very time consuming when you don't initially know how to do it. Its also not the most fun process as modelling as its just moving circles into their correct places.

Geometry with the controls. The circles repesent rotating parts and arrows (master
controller) for moving 


The colours represent left and right: Blue is left, red is right and yellow
is everything else


Tuesday, 27 November 2012

(Unrelated Maya Adventures)

Whilst designing the robot i decided to try and make some other robots from across films/tvshows. I first decided to model r2d2 from star wars. This was a much simpler endeavour than i first envisioned as all it required was a few polygons and lots of extruding. It worked out really well i think and the gold colour was the transformation from R2 to OG-D2.


I also decided to model Bender from Futurama as a bit more of a challenge, it turned out to be as much of a challenge is id thought. Turning a primarily 2d character into a 3d one poses some aesthetic issues as we are not  used to seeing Bender this way. The head was the hardest due to the visor and mouth. but after a lot of tweaking and moving vertices.


I used a shiny texture initially but it didn't look as good as when i tried a matte finish. Most likely because he doesn't have a shiny skin in the programme. Which makes me realise that the finish on a colour whether it be shiny, matte, glossy, pearlescent etc it makes a big difference to the final look of the model 


Thursday, 22 November 2012

UV Mapping


Today I found out that my robot character needed to be cylindrically mapped, and until i learn how to do this Iv'e got some examples of some UV and Bump mapped textures which i'm hoping to use with the cylindrical mapping.


Tuesday, 20 November 2012

Rigging the Robot,


Next its on to building the joint chains and making the rig, which will be used to animate the character. I found this surprisingly easy for most of the time as making joint chains is a very logical process. It also helps, i think, to remember how the human bodies joints work, elbow controls forearm hand, wrist only controls hand. Simple Hierarchy.

The Rig.

The hip dislocate joint had to be parented to the legs so the
chain links up.

The heels of my character are slightly raised off the ground
this is because the ankles of the robot are not the same as human ones
and need to be rigged accordingly.

I found parenting the collarbones to the spine and arms most challenging as
Maya didnt seem to like it when i parented one side as it then unparented the other
After a bit of tweaking i managed to link the rig and realised i was parenting the
wrong way.

Monday, 19 November 2012

Finished Robot & Broken Model.


The screen shots I took below show the final colours I decided on, although final doesn't necessarily mean it'll end up in the movie. I found a carbon fibre texture on the internet and its flowing lines and glossy black finish made it perfect for the robot's head, torso, pelvis, calves and feet. 

I used a metal texture for the neck and wires between the arms to distinguish between the two so there is an obvious difference in material to the rest of the robot.

I used red eyes because of the classic emotions of danger and fear invoked by the colour.


For the environment we have also been asked to create assets for the environment, to make it seem more realistic. So i decided that i would have a broken version of the robot laying crumpled in a heap at the side of the tunnel. I thought this would be a good idea because it implies that some sort of struggle has gone on between the robots and our hero. Leaving it just as the single robot could, again, imply a war but in which see the robots taking no casualties. 

I have also noticed that the robot could be mistaken for an alien in terms of how it looks. The dead and broken robot shows this due to the cracks and dents where as an alien would just have flesh wounds. The robot is also showing no attachment to the dead one showing it as a machine not an organism.


I first imagined making a broken version of the robot might be quite difficult but by deleting parts of it and pulling in faces and vertices I can create a very effective look of destruction. I was particularly impressed with the dents in the torso which look excellent and were so easy to do.


Sunday, 11 November 2012

Robot T_Pose Modifications.


After colouring the robot I gave him a second look and realised that he wasn't as detailed as i originally envisioned. So i added some modifications to combat this

Shoulder pads. made to look like armour


Again, made to look like armour

extra 'support' for the legs, and also to make the robot look more ready for action

Torso brace? Again for aesthetics and to stop him snapping in half 

More Variations on Colour.

The designs below are some experiments with colour beyond the silver, black and yellow. 


I experimented with using non block colours to see if stripes made the model stand out as its own but after looking at I think block colours work better. However Uv mapping a design onto the model might be the way forward as I can draw a more intricate design and apply it to the model which would work better than the stripes.


This was my attempt to turn him into a 'Law Bringing' robot so to speak, by using police like colours like black, gold and dark blue. However the blue doesn't really fit and i think bump mapping a police uniform texture might be the way forward if thats the way i go.


This is my favourite one as the pure white body and blood red eyes make for an ominous combination. Also the contrast between his light skin and the dark environment suggests the robot is not from here and that he is an invader of where ever we are in this dark tunnel. His white skin will allow him to show up a lot more against the dark tunnel walls and low lighting.


Testing Colours on the T_Pose.


Before attempting to UV/Cylindrical map I decided to use some basic colours on the robot to demonstrate the kind of colours I would be using. 


I chose silver and black initially because of the classic shiny robot image we see in so many films. The yellow eyes were to make the character seem more sinister. The black is to distinguish between the shiny chassis of the machine to the wires and working parts.


Colouring the robot all in black to see if it looked scarier, which it does. However our scene involves being inside in a dark tunnel like place so him being black might make him too difficult to see against the backdrop of the environment.


Friday, 9 November 2012

The Modelling of the Robot in Maya


Modelling the robot was actually quite fun but also challenging in places. Creating the robot from a sketch to screen was a fulfilling accomplishment and i've also learned even more about Maya in the process. The extrude tool became a vital part of my arsenal to create the character as i used faces on the body to make the arms and legs instead of making each one a separate object.

I have also made some alterations to the design such as removing the small extra wires on the elbow area. The head is also a different shape as the modelled one, the one in the model is elongated at the bottom to give it a more human shaped face.


 These two images (of the feet) Are another alteration I made to its initial design. I used the same principal as the neck to create these but also took inspiration from the blades the paraolympian athletes run on as well.

The image below shows another one of the changes I made. I tried making the neck from the base of the sphere but it kept looking wrong and out of place, then I had the idea to make a funkier neck as opposed to the norm. I think it came across pretty well as the neck line is a lot smoother. 

 The legs were, again, straightforward to make. I used the same techniques as the arms but probably better.


The next job is to colour the robot. I will first do this with the hypershade tool to give simple colours to show how it would look. I hope to experiment with cylindrical mapping to get a cleaner wrap around the object.

Robot T_Pose.


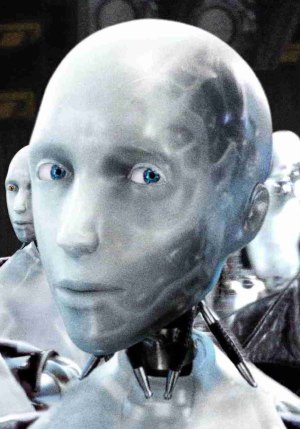
This is my T_pose for the robot guard in the cinematic. The robot is inspired by the NS5 from iRobot using the basic shape of the torso and adapting the wires which make up the thighs and arms of the character. Originally I was only going to use a single eye but after playing around in Maya trying to make a plane bend round into a circular shape proved to be to difficult to make loom good. So I added an extra eye to balance it out. I after drawing it I found i preferred this to the single eyed alternative. 

I figured that a robot which seems more humanoid would be scarier than one which does not because robots imitating humans starts to make us seem obsolete, which is why the design of the robots in iRobot and Terminator are so life like. 

Thursday, 8 November 2012

Game Cinematic Robot Design


Our groups idea for the cinematic is based around the title of SURVEILLANCE. Our idea has changed slightly with our group coming up with an idea which worked better and could be done to a higher quality. Our development work has helped us come to this conclusion.

I was put in charge of designing the robot our character is looking for.

I first started by looking at other robots from films and games. I did this to find inspiration on how robots should look and how their design changes due to the genre of the game.


Looking at robots from films: I thought of an iconic design from the film irobot. Set in the near future the robots (NS5) are sleak and streamlined which makes them look attractive and friendly. This is shown by the attempt to make a basic human shaped face and make them appear more human as a result. 


Another example is R2-D2 a robot who appears (obviously) in the Star Wars films. This uses a very different concept where the type of robot R2-D2 is makes him more of a drone like machine where as the human shaped NS5 is more like a companion or assistant. We see a lot of drone like machines but in different shapes as well. In total recall, the machines look like humans in armour but are automated machines with a simple 'kill' directive.


--


The robot I am designing does fall under the drone category. This is because the title SURVEILLANCE implies security, alarms and guards etc. So by using the images of other robots which I have researched I can now develop an intelligently (ish) designed robot to act as the surveillance part of our project. I will be blogging about the project as a whole but this was just to outline my job.

Friday, 2 November 2012

Ron & Terry MAYA

These are the models I made for ron and terry. Ron being the mouse was really easy to model with just basic polygons and some editing of the faces, Despite the simplicity i thought it went well as it looks like the picture. The same goes for terry who looks just like I imagined and looks like he doesn't give a shit about the cheese. The idea for Ron was a cross between the roadrunner and a mouse. The roadrunner is because in cartoons when a characters legs move really fast while running it looks like wheels. Hence why i made the mouses actual legs, wheels. 


The models were nothing exciting in terms of complexity but the point was to make a simple character which could operate easily in a simple environment.